Shiba Inu is a relatively new cryptocurrency that has gained a lot of attention and popularity in a short period of time. The meme-based cryptocurrency was launched in August 2020 and has since become one of the most talked-about cryptocurrencies in the market. With its rapidly growing community and unique branding, many investors and traders are curious about the future of Shiba Inu. In this article, we will discuss the future predictions of Shiba Inu and the factors that could impact its growth. The first thing to consider when making predictions about Shiba Inu's future is the current state of the cryptocurrency market. The market is highly volatile, and the prices of cryptocurrencies can fluctuate rapidly due to various factors such as regulatory changes, global economic conditions, and investor sentiment. Shiba Inu is not immune to these fluctuations, and its price has been known to rise and fall quite rapidly. Despite the volatility of the cryptocurrency market, there are a f...

Introduction
Microsoft is developing a full-featured free version of the SQL Server Developer edition, licensed for use in a non-production environment as a creation and test database. On Windows Server 2019, we are going to install SQL Server 2019 Developer Version. It is supported for operating systems such as macOS, Ubuntu, SLES, RHEL, and Windows.
Before we start, head over to the Microsoft SQL Server Downloads page and download SQL Server 2019 Developer Edition.
Step 1: Run Install Application
Navigate to the directory/folder where the application was downloaded, then double-click it to begin the installation process.
Step 2: Select Custom Installation
After you've got chosen the custom installation, click on “Install“. Allow the application to download and install packages.
You have the “Basic“, “Custom” and “Download Medium” installation types. I recommend you select “Custom” to tweak your installation of SQL Server 2019 Developer Edition on Windows Server 2019.

Specify a directory where SQL Server will store files downloaded for installation.

Be patient because the download begins, it's going to take a while.

Step 3: Choose Installation
After all of the packages have downloaded, a new page as illustrated below will follow. Click on “Installation“

Step 4: Choose New SQL Server standalone
After Step 3, choose the first option in the list and proceed to the next step. This is illustrated below.

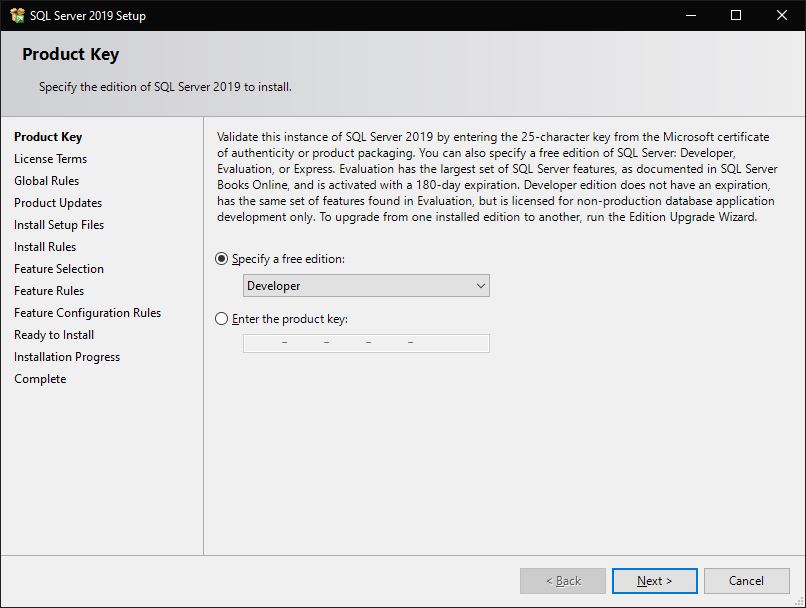
Step 5: Specify Edition
Whether you need "Developer", "Evaluation" or "Express" depends on this phase. In the window, their differences are defined. Let us proceed with that option because we are downloading the "Developer" version. Select "Next"
Step 6: Accept License Terms
Select the “I accept the license terms and Privacy Statement” Radio and tap on “Next“.

Step 7: Microsoft Update
You can either select the “Microsoft update” radio or not in this step then click “Next“
Step 8: Install Rules
In order to find out any possible issues that can arise when the setup is running, Windows will check the device. If your firewall is running, you can see a "Windows Firewall" warning sign that reminds you to open the necessary ports after completion of installation. After you are pleased with the results of that tab, click 'Next.'

Step 9: Feature Selection
You are presented with many features that SQL Server comes with in this phase. If you want to include a specific feature in your SQL instance, then this is the part you choose for their radio buttons. Go ahead and pick what you prefer to have. After you are done, press 'Next.'

Step 10: Instance Configuration
Name your instance, in this step and click on “Next“.

Step 11: Server Configuration
Specify the service accounts and collation configuration here. Click “Next” after that.

Step 12: Configure Database Engine Parameters
This step gives you the chance to choose the authentication mechanisms to use, set an administrator account password, and choose other admin accounts.
I prefer mixed-mode authentication, where a user in the SQL instance can be either from a domain or manually inserted. Choose the one that best suits you, enter the password and any other configuration you would like to set up.
You will note if you are keen, that there are other tabs on this list. There are "Data Directories" where you can decide where you want your logs to live, where your root directory is going to be where your backup directory and database directory should be located.
You can position these directories in a smart way if you have numerous partitions on your server. "Memory", "TempDB", "MaxDOP" and "FILESTREAM" are the other tabs. Look at them and configure your custom settings therein.
When you are done, click on Next'. Do not forget to add a user to the admin.

Step 13: Analysis Services Configuration
Since I enabled analysis functionality, this is often the step where I configure them. Choose an administrator and set the server mode that you simply prefer. Click on “Next“.
Step 14: Accept Installation of Services
If you have selected specific packages in Step 9 to suit your needs, the installation guide and settings tailored for that particular service will be presented to you. I have chosen Python, for example, and now I am being asked to consent to its installation. Click "Next" to proceed after you're done with all the prompts.

This step offers an overview of what we've been doing so far. The packages we chose to install, the configuration settings we configured, and many more. Look carefully at the list. Then please click on "Install" after you are satisfied with the summary.
Wait as the server gets installed.

Step 16: Finish up
After everything has installed. Click on “Close“. Your SQL instance is installed and you prepared to be used.
Conclusion
Our instance of SQL Server 2019 has been finally installed. Connecting to it, creating databases, and taking advantage of its resources is what remains. Next, we are going to look at how to use SQL Server Management Studio to connect to our SQL instance. We'll install it and use our SQL resources to kick it off. Thank you for hanging out with us and for your ongoing assistance.
Comments
Post a Comment